Overview
This page contains information for developing a sandwiching AlphaLISA™ immunoassay.
Finding an antibody pair
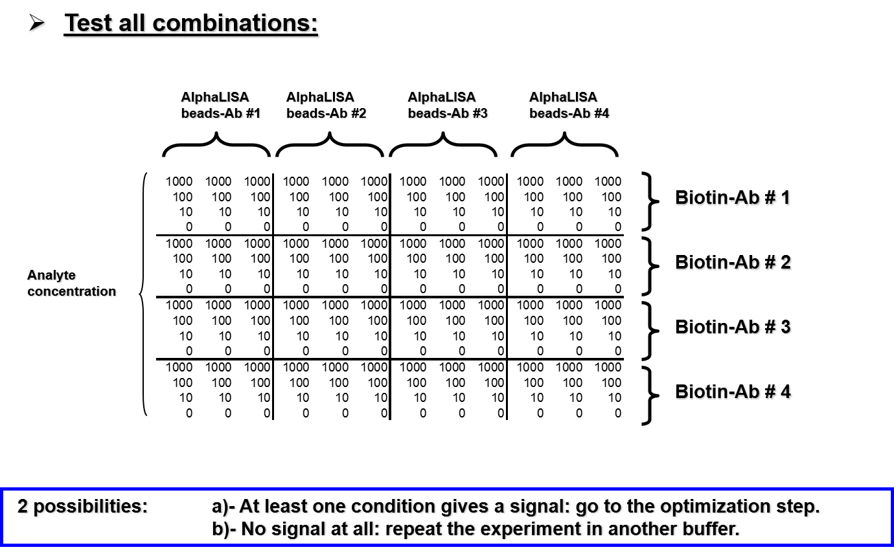
- Try to find an antibody pair that has already been tested in a sandwich assay (Figure 1).
- Each antibody should recognize a different epitope on the biomarker, and must be specific to the biomarker.
- Monoclonal or purified polyclonal antibodies will perform best.
- For a given antibody pair, make sure you test both bead configurations:
- biotinylated antibody A with directly-conjugated antibody B
- biotinylated antibody B with directly-conjugated antibody A
- The antibody is the most important factor for assay performance.

Figure 1. Cross-titration matrix to determine the best sandwiching antibody pair.
Buffer selection
A standard assay buffer is: 25 mM HEPES (pH 7.4), 1 mg/mL Dextran T-500, 0.5% Triton X-100, 0.1% casein
Visit Buffer selection for Alpha assays for help in choosing a suitable buffer for your assay. This page describes the various Alpha immunoassay buffers supplied by Revvity and will help you avoid interfering substances in buffers of your own design.
Biotinylated antibody titration
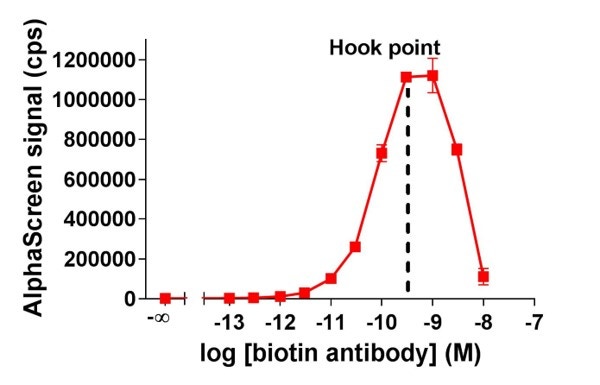
- The biotinylated antibody should be titrated from 0.1 nM to 10 nM final concentration.
- Pick a concentration below the hook point (Figure 2).

Figure 2. Biotinylated antibody titration data. At the hook point, you have saturated the system.
Order of addition
- Order of addition can have a profound effect on assay sensitivity.
- In general, the most common protocol entails mixing the Acceptor beads, sample, and biotinylated antibody, then incubating for 30-60 minutes, adding streptavidin Donor bead, and then incubating for another 30--60 minutes.
- You may need to add one antibody at a time. You will want to try adding the biotinylated antibody first to your sample and incubating before adding Acceptor bead. You will also want to try switching the order of addition by adding the Acceptor bead to your sample first, incubating, and then adding biotinylated antibody.
Definitions
- One-step assay: mixing both antibodies, sample, and beads together, all in one step.
- Two-step assay: mixing the antibodies, sample, and Acceptor beads together first, incubating, then adding Donor beads for final incubation.
- Three-step assay: mixing sample first with one of your antibodies, incubating, adding the second antibody, incubating, then adding Donor beads for final incubation.
Preincubation steps
- It may be necessary to pre-incubate the Donor bead with the biotinylated antibody before introducing this antibody to your sample. This is usually not needed, as the streptavidin-biotin interaction is relatively quick and relatively strong.
- For indirect formats, it may be necessary to pre-incubate the unlabeled antibody with the protein A-coated or protein G-coated Acceptor bead. This is usually needed for indirect assays.
Bead ratio
- Design a matrix of bead concentrations ranging from 10 to 40 µg/mL.
- We recommend testing a range of 4:1 to 1:4 Acceptor:Donor bead.
- When changing the concentration of streptavidin Donor bead, one must keep the ratio of biotinylated antibody:streptavidin constant. This means you will need to simultaneously titrate the biotinylated antibody.
- For most AlphaLISA assays, 10 µg/mL of Acceptor beads and 40 µg/mL of Donor beads is optimal.
Choosing a diluent for your standard curve
For quantitation of analyte in your samples, it is necessary to create a standard curve of your analyte in a diluent that closely matches your samples. For example, if you are working with serum samples, you will need to create a standard curve of your analyte in analyte-depleted serum or something similar, such as fetal bovine serum (FBS). Linearity and spike-and-recovery experiments should be performed to assess whether a proposed diluent is suitable for your sample type. For more information on how to perform these experiments, refer to our section on Working with serum samples and other complex matrices.
Tips for competition assay formats
Competition assay formats are often used to detect small molecules that are too small to allow more than one antibody to bind at a time. This can affect aspects of assay development.
- Try an indirect assay format in which the antibody is not directly coupled to the Acceptor bead, but rather is captured by a Protein A Acceptor bead. This approach usually gives higher total counts and equal or better sensitivity.
- The linker length of the biotinylated analyte probe can be important in developing a successful assay. To overcome steric hindrance to antibody binding, some assays (but not all) require that a 6-carbon chain be used to link biotin to the analyte.
- We recommend testing between 0.5 nM and 10 nM of probe (with 20 µg/mL of each bead). Lowering the concentration of your probe will make the assay more sensitive.
- The order of addition should allow binding of the analyte sample to the antibody before other assay components are added. Try a 3-step protocol:
- Add analyte sample to antibody (or antibody-coupled Acceptor beads). Incubate 30 min.
- Add biotinylated analyte probe. Incubate 30 min.
- Add streptavidin-Donor beads (and protein A-coupled Acceptor beads, if doing an indirect assay). Incubate 30 min.
For research use only. Not for use in diagnostic procedures.
The information provided above is solely for informational and research purposes only. Revvity assumes no liability or responsibility for any injuries, losses, or damages resulting from the use or misuse of the provided information, and Revvity assumes no liability for any outcomes resulting from the use or misuse of any recommendations. The information is provided on an "as is" basis without warranties of any kind. Users are responsible for determining the suitability of any recommendations for the user’s particular research. Any recommendations provided by Revvity should not be considered a substitute for a user’s own professional judgment.


